It is easy to turn simple French doors
into a usable and functional
divider screen to use in your
Miniature Dollhouse rooms.
I had a set of French doors that the
molding had broken and I did not
want to replace moldings.
So, I decided that I
needed a divider screen
more-so.
In one of my Miniature Dollhouse
Books (cannot remember which one),
said to use ribbons.
So I decided to do just that!
My pics are a little out of order,
because I made the divider screen to use
in Samantha's Apartment.
And after I made them - I painted them white.
Then I decided that I would paint
them chocolate brown.
Then I decided that Samantha did
not need a divider screen.
This is the French doors in their
raw state.
Like I said, my molding got broke
really bad in a number of spots.
I decided not to replace the
molding.
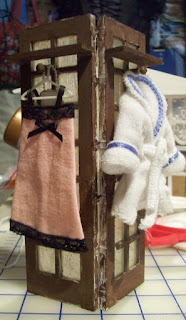
You can see here the divider screen
made from the French doors.
There are only one coat of white
paint on the divider screen.
Here they are already painted
white, but I started painting
them a chocolate brown
as you can see by the window glass.
I cut tiny 1/4th inch
wide white ribbons and glued them
to one side.
I glued 6 ribbons for added stability.
These ribbons were painted over
when I painted the divider
screen white.
I have painted over them with chocolate brown
to match the divider screen.
I also cut 2 pieces of balsa wood
for shelves and added some
knobs below to hang hangers.
This is a close up of the shelves and knobs.
UPDATE - I re-painted this one
side white again. I wanted it to
be messy (trying to achieve a shabby
chic look).
I know you cannot see it, but there
are bits of brown on this side.
After painting it back white, I
took a toothpick with some brown
paint on it and randomly gave it some
marks. You can see a couple at
the bottom right side of screen.
I took some cotton lace and gathered
it at the top and bottom and
then used tacky wax to adhere it
to the screen.
Cotton lace stretches!
I placed clothes upon it to use
in Diana's apartment.
Thanks for stopping by!
Conny


